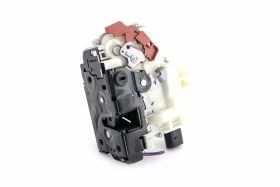
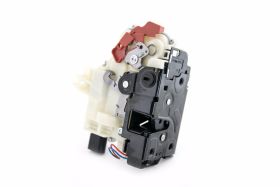
Diagnosis and Replacement DIY for your MK5 Jetta Rear Door Latch (Lock Module) Assembly


This write up applies to the following models
Volkswagen Jetta Sportwagen MK5 and MK6 2005-2006-2007-2008-2009-2010-2011-2012-2013
Volkswagen Jetta MK5 2005-2006-2007-2008-2009-2010
Volkswagen GTI MK5 2006-2007-2008-2009-2010
Volkswagen Rabbit MK5 2006-2007-2008-2009
This article is for replacing the rear door latch assemblies list below
VW MK5 Drivers Rear Door Latch Assembly 3B4839015AP
VW MK5 Passenger Rear Door Latch Assembly 3B4839016AP
The VW door latch on these cars can be a very tricky component. Can also fail in various ways that may/may not cause you to notice it right away.
A few of the ways to tell if your latch is going bad are:
- System will arm, but door can still be opened after locking(may/may not sound alarm)
- Car will lock when pressing remote, but system does not arm
- When door is opened, does not indicate it in cluster or with interior lighting.
- Battery drains by keeping system “awake” for extended periods of time.
- Alarm sounding for no apparent reason.
This DIY was performed on a 2008 Jetta with an issue in Right Rear door. Repairs are almost identical for Left Rear, just on the other side of the car.
Tools needed to perform this repair:
- T20 torx bit
- T30 torx bit
- M6 triple square bit
- Small screwdriver/pick
1. Open the door in question and you will see a black rubber/plastic seal cover running down the door. Shown below in the picture.

2. Grab the bottom of the cover and slowly pull it out to release the clips that hold it in place. It is pretty forgiving, but keep firm, even pressure on it as you work up the cover releasing the clips.

3. Once removed, you will see the bolts down the side as well as a small circle of greyduct tape. You are going to want to remove this tape circle to gain access to the T20 screw hidden behind it. This screw holds the lock housing portion of the handle in place and must be removed for this repair.

4. While unscrewing the T20 located inside the hole, make sure you are holding out on the door handle. This screw is not to be completely removed. This screw should be loosened until the cap where the lock cylinder would be can be removed. This will allow the locking ring to stay in place while you're move the handle. You should now be able to remove the dummy cover where the lock cylinder would normally be located. Just pull it out of the door and set it to the side.
5. Now you are left with the door handle to remove. You can see there is a cable attached to the handle that needs to be removed.

(Note it’s position as it can be adjusted and should be put back in about the same place as when you started. It rides in a grooved channel and is usually placed towards the back of the grooved channel on most cars). Pop the cable loose to free up the handle.
6. Now to removed the handle. It’s a 2-motion action to remove it that is fairly simple. Step 1: Slide the handle towards the backside of the door……

Step 2: Rotate the handle towards you and outwards to remove it from the door…….

7. Now to remove the begin removing the T30 bolts holding the skin on. There are several different bolts use around the door skin. Placement is CRUCIAL to prevent damage to the holding plates glue to the door skin!!!! Here is a diagram showing bolts around the door and the placement of different bolts.Keep them separate to ensure they go in correct locations. (Note #2 bolts have no shoulder washer. #4 has a pointed tip)

8. Once all these bolts are removed, the skin will be loose feeling, so be sure to have a good hold on it. Or have a second set of hands helping to ensure there are no mishaps causing scratches/dents in the skin. There is one last bolt securing the skin. It lies behind where the door handle was. A small T20 that screws into the door latch bow shown below.

9. Once this is removed, carefully lift the door skin off the shell and set it to the side somewhere safe…..not a good idea to lean it against things as I’ve seen bad things come from that. Lay it flat on the ground(painted side up of course).
10. The latch only has 1 electrical connection on it. It is a typical VW-style connector. Using your thumb or a small pick/screwdriver, release the lock and slide the connector down off the latch.

11. Now you will be left with a naked door and all the internal workings.

So all that’s left if swapping out the latches. First we need to remove the door latch bow. To do so, there is a purple rubber band holding it to a little hook. Carefully remove the rubber band making sure not to break it.

12. There are 2 M6 triple-square bolts that hold the latch in place on the backside of the door frame. Shown below

13. Once these bolts have been removed, the latch will still feel somewhat attached.That is due to a claw that the latch is slid down on to. You must now, lift up slightly on the latch

While also rotating it slightly out towards you to gain access to the cable and disconnect it and free up the latch.

Pop the black cable lock out of it’s holder.
It’s hard to show what you are trying to release from this picture. But here it is once you get it unhooked.
This prong/hook………………….slides into……………………….this slot and locks in place.


Rotate the cable to slide it out of the slot it rides in shown below.

Once this is free, you should now be holding the door latch in your hand separate from the door.
14. What is the white cover/shroud around the door latch for you may ask? It’s annoying to work around, but does serve a purpose. This makes it harder to someone to break into your car with a “Jimmy Stick” by covering the latch as well as keeping the electronics dry from water that runs down between you glass and seals. The cover is held into place with 2 clips….shown below

Once these are popped loose, you can separate the old latch from the cover and begin the reassembly process. You should be left with this image of the door latch and the water shield.

15. Be sure to swap over the cable release for the door handle pull. To do so, rotate the cable so it is pointing straight up in the air and slide it back towards the latch.

When reassembling, it is important to note how the cable was installed that hooks to the door handle(This is the short 2.5” cable with lock on end). Here is an image for installation reference…….

16. Reassembly is in opposite order of teardown. Once latch is installed back into place, just install door skin and have someone hold it in place while you start all the bolts. Use the old marks from where the door skin bolts were as a guide so that your body lines will be as close as possible with minimal adjusting required after you are done. And remember to install the bolts in the CORRECT LOCATIONS!!
17. Once completed, make sure the handle operates as it should by opening and closing the door to make sure it doesn't bind and the handle releases on first pull.Also check the door alignment with the front/rear gaps to make sure nothing is rubbing or hitting. Reinstall your cover over the door bolts in rear section and you are done.
Congratulations…..you have now successfully replaced your rear door latch.


Comments